Integration of IDM software with Home Assistant through MQTT
This is an overview of two simple demos showing how to integrate IDM software with Home asistant using MQTT functionality
Demos is based on Smart Fuse and Monodaq hardware, but it can be easily tailored to any device supported by IDM software.
Software needed:
MQTT broker (We use https://mosquitto.org/, but other can be used)
Python 3 (https://www.python.org/downloads/)
Home Assistant (https://www.home-assistant.io/)
Isotel IDM (Release 190919-1 or newer)
IDM MQTT functionality
IDM supports two main functions to be used with MQTT protocol:
Publishing connected device data, both full device overview and individual parameter values
Setting parameter values
To enable this functionality, device parameters need to be mapped to MQTT topics. If paramteter value setting fucntionality is required, a request topic needs to be defined as well. Device parameters can be mapped to arbitrary topic name, but we recommend mapping each parameter to a different topic. Mapping can be done through IDM GUI or by editing the idm.conf file directly. Configuring mappings will be discussed in detail in next section.
Default topic payload format for MQTT data is json. Format is the same as used by IDM HTTP API.
Example payload (‘N’ is the name of parameter):
{"N":{"value":"2"}}
To simplify the above, plain text format is also supported. This can be achieved by defining publish topic mapping with ‘.txt’ suffix.
In this case, the equivalent of the above ‘N’ parameter payload would be:
2
Value set request topics do not need the ‘.txt’ suffix, IDM detects the payload format automatically.
IDM MQTT configuration
To enable MQTT functionality, a MQTT broker is required. We used mosquitto MQTT broker, but others can be used as well.
Mosquitto page with all info required to set up a broker: - https://mosquitto.org/
IDM can be configured either through GUI or by editing the idm.conf file directly.
GUI Settings
GUI Configuration can be done in two screens:
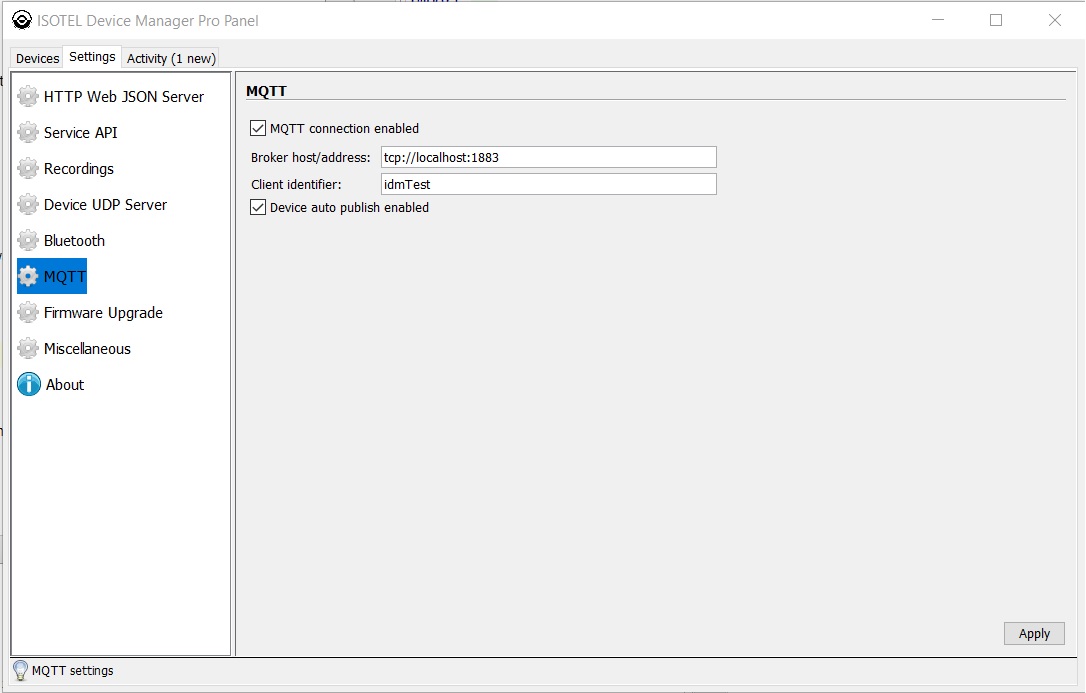
IDM Home Screen > Settings > MQTT
Here, ‘MQTT connection enabled’ checkbox must be checked, and appropriate broker addres entered. Client identifier is arbitrary, unless some security settings are set on broker side.
Example:
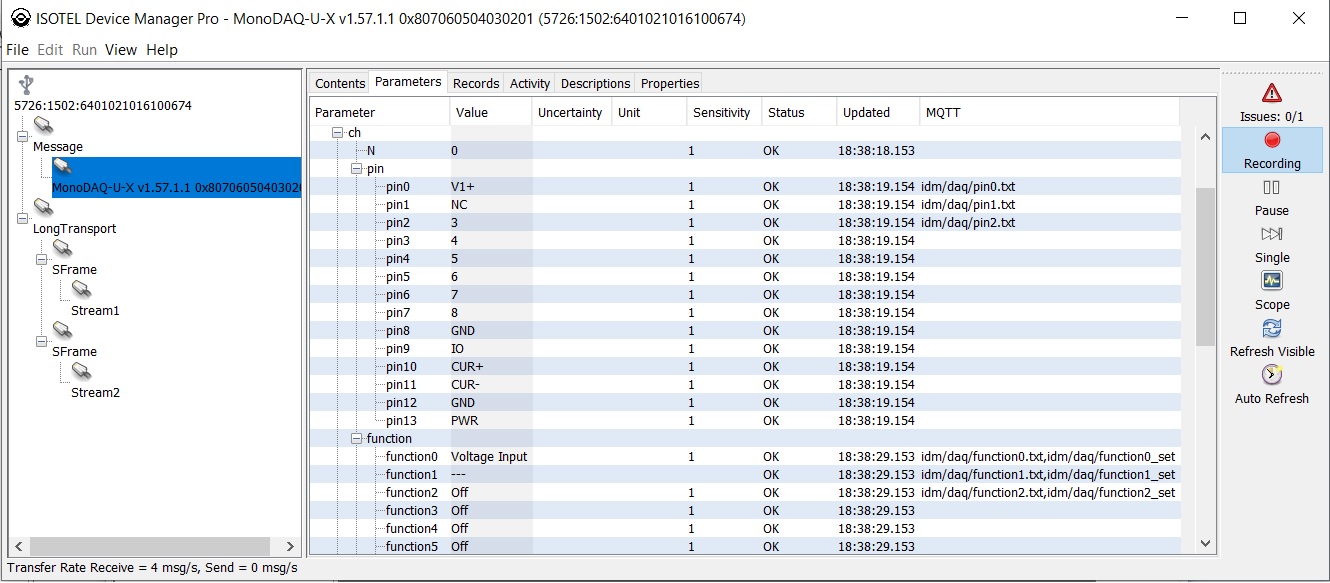
Parameter mappings can be done in advanced device screen, ‘Parameters’ tab, by editing the ‘MQTT’ column. Here, for each parameter, the correspondent MQTT topics can be entered. Two topics can be entered here, separated by comma. The second entry is the value set request topic.
Below is an example of Monodaq parameter mappings. Here for ‘pinX’ paramters only publish topic is defined, while for ‘functionX’ the value set topics are also defined:
Configuration file settings
Alternatively, IDM configuration file ‘idm.conf’ (found in working directory) can be edited directly
To illustrate, we will use the Smart Fuse demo examples.
Main part of interest is the ‘misc’ > ‘mqtt’ section. The first part are the same settings as those in the IDM Home Screen > Settings > MQTT screen Below, each device parameters that we wish to display must be mapped to mqtt topics. Here we mapped energy, power, voltage, current, and channel state parameters.
Note the channel state defines two topics, separated by comma. The second topic allows home assistant to set new channel state by selection an option in input select component.
To simplify integration, publish topics have ‘.txt’ suffix which means the parameter value is published in simple string format instead of default json format.
Whole mqtt section example:
"mqtt" : {
  "enabled" : true,
  "broker" : "tcp://localhost:1883",
  "client_id" : "idmTest",
  "auto_publish_enabled" : true,
  "mapping" : {

    "ECL-10AC-BT-Modbus-1.2.0-1878 50391825 (sf-ecl)" : {
      "ecl.E" : "idm/ecl/E.txt",
      "ecl.tar" : "idm/ecl/tar"
    },
    "Smart Fuse1 50397185 (sf-ecl)" : {
      "ec.E" : "idm/mod1/E.txt",
      "ec.P" : "idm/mod1/P.txt",
      "ec.U" : "idm/mod1/U.txt",
      "ec.I" : "idm/mod1/I.txt",
      "ec.ChA" : "idm/mod1/ChA.txt,idm/mod1/ChA_set"
    },
    "Smart Fuse3 50528257 (sf-ecl)" : {
      "ec.E" : "idm/mod2/E.txt",
      "ec.P" : "idm/mod2/P.txt",
      "ec.U" : "idm/mod2/U.txt",
      "ec.I" : "idm/mod2/I.txt",
      "ec.ChA" : "idm/mod2/ChA.txt,idm/mod2/ChA_set"
    }
  }
}
Home Assistant
Home Assistant software can be found at: - https://www.home-assistant.io/
Useful links for installation and basic setup:
Home assistant demo files need to be placed in main .homeassistant folder
On Windows 10, this is found in:
c:UsersTKAppDataRoaming.homeassistant
Home Assistant Smart Fuse Demo
All necessary Home Assistant configuration files are found in home_assistant_sf_demo.zip
Files need to be placed in main .homeassistant folder
Integration requires user to properly configure Home Assistant and IDM configuration file (idm.conf)
The IDM configuration is already discussed in previous section.
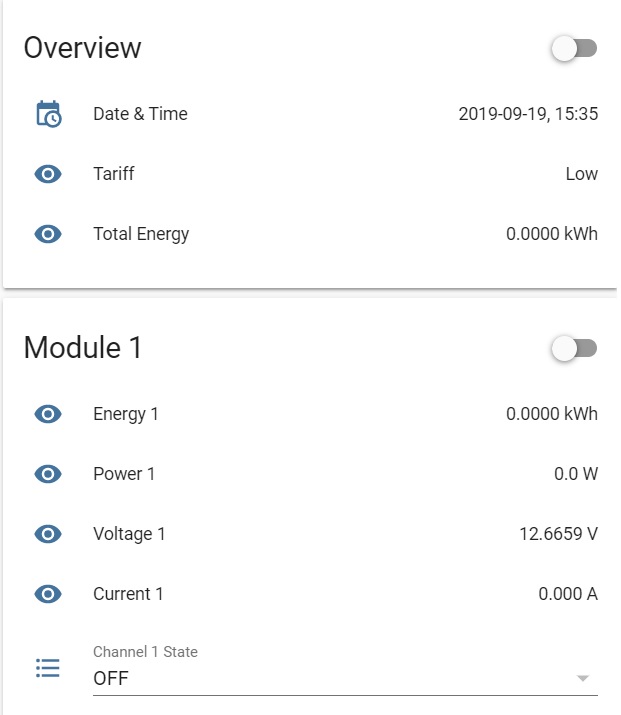
Demo example:
Home Assistant configuration is split into multiple files, below are examples of most important sections
configuration.yaml
Here we must define mqtt broker settings:
mqtt:
  broker: 127.0.0.1
  port: 1883
We also define Input Select components for displaying and setting module channel state.
input_select:

  channel_a_1:
        name: Channel 1 State
        options:
         - 'OFF'
         - 'AntiSmog'
         - 'ON'
         - 'Suspend'
         - 'Limit'
         - 'Fault'
         - 'WaitPriority'
         - 'VoltageFault'
         - 'UnderVoltage'
         - 'OverVoltage'
         - 'OverConsumption'
        initial: 'OFF'
Input select functionality is defined in automations.yaml file
automations.yaml
Here we define two scripts for each Input Select components, one for displaying the current channel state, and one for setting a new state.
Example:
    # Display state
    - alias: Update Select A1
      trigger:
            platform: mqtt
            topic: "idm/mod1/ChA.txt"

      action:
             service: input_select.select_option
             data_template:
              entity_id: input_select.channel_a_1
              option: "{{ trigger.payload }}"

# Set new state
    - alias: Set Select A1
      trigger:
            platform: state
            entity_id: input_select.channel_a_1
      action:
            service: mqtt.publish
            data_template:
              topic: "idm/mod1/ChA_set"
              retain: false
              payload: "{{ states('input_select.channel_a_1') }}"
sensor.yaml
Here we define parameters to be displayed. We define a sensor entry for each mapped parameter.
Example:
#Overview
  - platform: time_date
        display_options:
          - 'date_time'

  - platform: mqtt
        name: Total Energy
        state_topic: "idm/ecl/E.txt"
        unit_of_measurement: 'kWh'

  - platform: mqtt
        name: Tariff
        state_topic: "idm/ecl/tar.txt"

# mod 1

  - platform: mqtt
        name: Energy 1
        state_topic: "idm/mod1/E.txt"
        unit_of_measurement: 'kWh'

  - platform: mqtt
        name: Power 1
        state_topic: "idm/mod1/P.txt"
        unit_of_measurement: 'W'

  - platform: mqtt
        name: Voltage 1
        state_topic: "idm/mod1/U.txt"
        unit_of_measurement: 'V'

  - platform: mqtt
        name: Current 1
        state_topic: "idm/mod1/I.txt"
        unit_of_measurement: 'A'
groups.yaml
Here we group components into groups for display:
Example:
default_view:
  view: true
  name: "Over"
  entities:
        - group.overview
        - group.module1
        - group.module2

overview:
  name: "Overview"
  icon: mdi:home-variant
  entities:
        - sensor.date_time
        - sensor.tariff
        - sensor.total_energy

module1:
  name: "Module 1"
  entities:
   - sensor.energy_1
   - sensor.power_1
   - sensor.voltage_1
   - sensor.current_1
   - input_select.channel_a_1
Home Assistant Monodaq Demo
Second demo uses Monodaq board, functionality is similar to Smart Fuse demo.
All necessary Home Assistant configuration files are found in home_assistant_monodaq_demo.zip
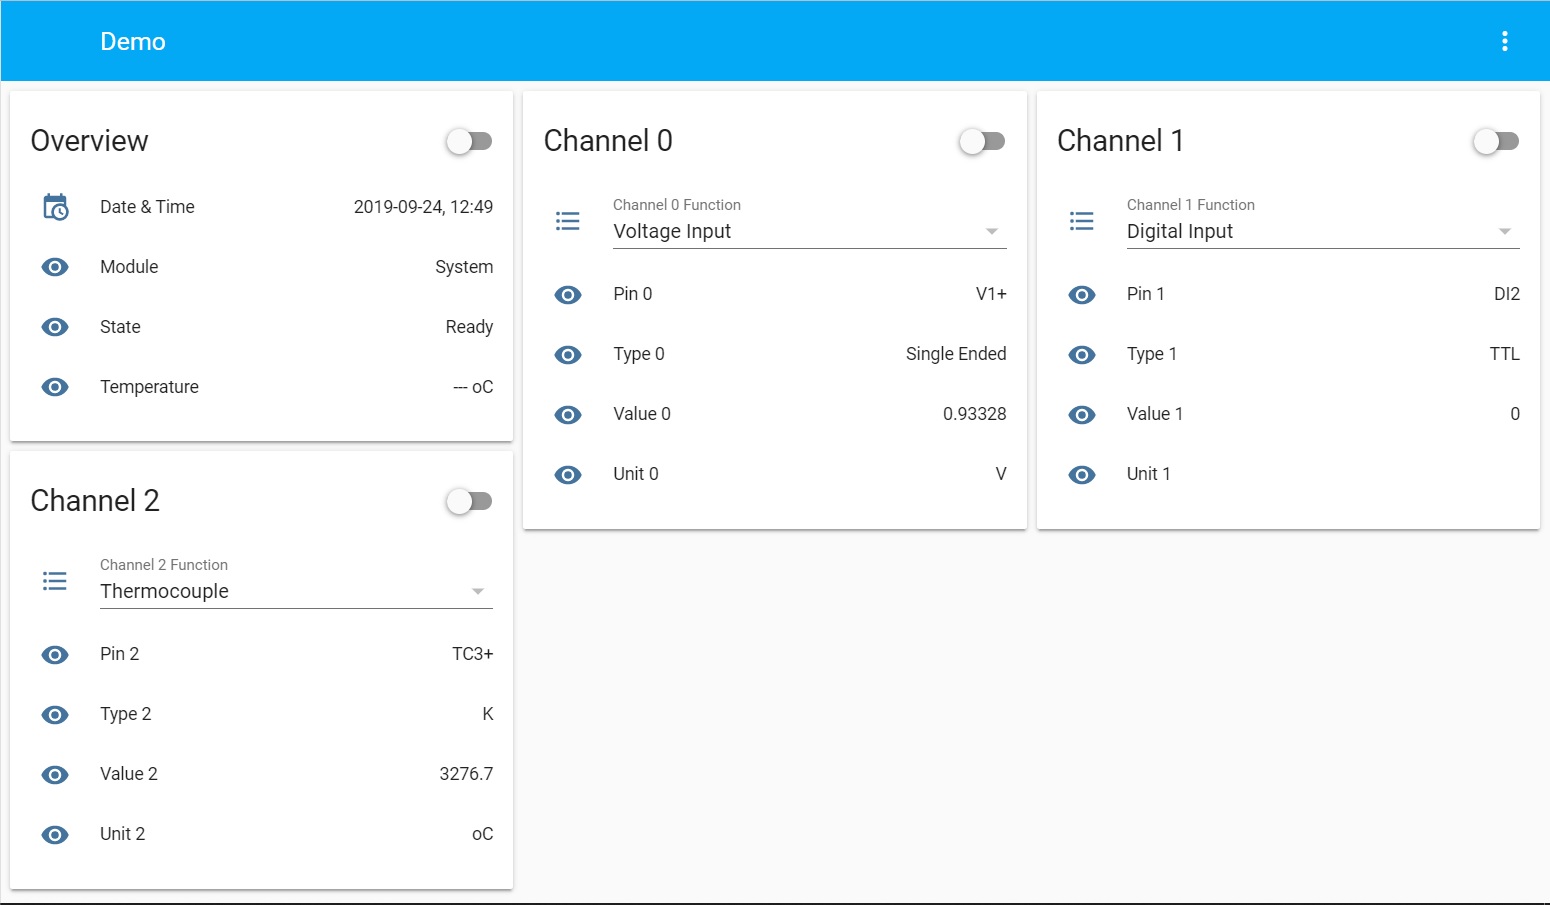
We displayed the first 3 channels and what we thought are main parameters of interest.
Channel functions can be changed using input select for each channel.
Demo example screen:
IDM MQTT parameter mapping
MQTT mapping for Monodaq demo:
"MonoDAQ-U-X v1.57.1.1 0x807060504030201" : {
  "sys.module" : "idm/daq/module.txt",
  "sys.state" : "idm/daq/state.txt",
  "sys.cpu.T" : "idm/daq/T.txt",
  "ch.value.value0" : "idm/daq/value0.txt",
  "ch.value.value1" : "idm/daq/value1.txt",
  "ch.value.value2" : "idm/daq/value2.txt",
  "ch.pin.pin0" : "idm/daq/pin0.txt",
  "ch.pin.pin1" : "idm/daq/pin1.txt",
  "ch.pin.pin2" : "idm/daq/pin2.txt",
  "ch.type.type0" : "idm/daq/type0.txt",
  "ch.type.type1" : "idm/daq/type1.txt",
  "ch.type.type2" : "idm/daq/type2.txt",
  "ch.function.function0" : "idm/daq/function0.txt,idm/daq/function0_set",
  "ch.function.function1" : "idm/daq/function1.txt,idm/daq/function1_set",
  "ch.function.function2" : "idm/daq/function2.txt,idm/daq/function2_set",
  "ch.unit.unit0" : "idm/daq/unit0.txt",
  "ch.unit.unit1" : "idm/daq/unit1.txt",
  "ch.unit.unit2" : "idm/daq/unit2.txt"
},